
In a previous post, I outlined the end result of a few months of tinkering with some low-grade hardware to create a Kubernetes (K8s) cluster. This is a follow-up post for the dorks that actually want to know how it was accomplished.
Preamble
This is not going to be a very unique post. There are numerous, numerous, numerous, numerous guides for how to build a cluster with Raspberry Pis.

I used a mismash of different guides to help me in my attempts to finish this project. A lot of them were very helpful. I found Alex Ellis’ “Will it cluster?” to be the most useful. Check it out! He has a lot of great content on his personal blog related to Raspberry Pis. While a lot of the guides were both informative and prescriptive, there were a few detours that I had to take for this to work out completely for me. For example, a lot of guides recommend using the stock Raspbian images that are optimized for the Raspberry Pi. I instead went with Ubuntu, as I was a bit more familiar with Ubuntu flavors of Linux rather than the Debian-based OS. In addition, I was having a bunch of trouble getting ARM64 docker images working on Raspbian. Allegedly this is a possibility but I couldn’t get it working.
Hardware Setup
This is the actual physical piece of the setup. I had to step out from behind a keyboard and actually smush things together with my hands. Fun!
Materials List
Raspberry Pis
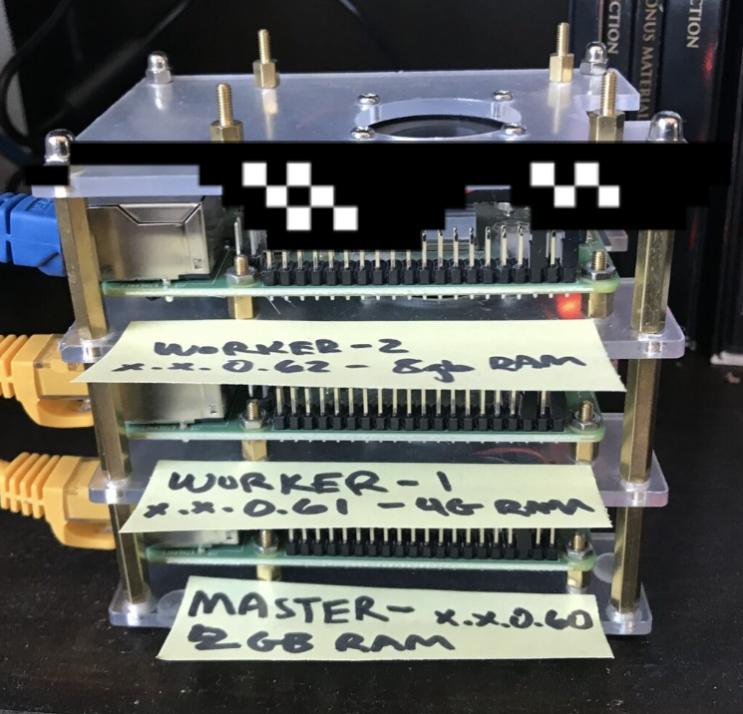
I needed 2+ Pis. One for the master Kubernetes node, and 1+ for the worker nodes. While it is possible to run a single-node K8s cluster, it isn’t recommended because any sort of failure on the single node will result in an outage. The Raspberry Pi 4 has a few different price points for the hardware. There is a 2GB RAM model available for $35 up to a 8GB RAM model for $75. I got one of each in order to test out how much RAM actually makes a difference for worker nodes. More on this in a follow up post regarding monitoring and performance.
Necessary “Accessories”
These are the infrastructure for your infrastructure. I always forget to price in these things, but you’ll want to remember to get each of them or else you’re going to have a few problems.
Power Supplies
Get the official Raspberry Pi Foundation supplies. I didn’t want to chance fluctuations in the power draw.
SD Cards
I just got some Samsung 64GB SD cards off of Amazon. At the time of this writing, they’re $10.99.
Networking Necessities
I decided to run these through a 4-port network hub with dedicated ethernet cables for each Pi. This allowed me to more easily track network failures by eliminating faulty WiFi as a suspect and also to boost networking performance. K8s is a network-intensive application and thus having actual networking hardware was a must.
Optional Accessories
These are a few of the things that I chose to add for performance, style, and as a learning experience.
Cluster Case
I wanted my Pis to feel their absolute best, so I added a cluster case that allowed for spacing between the Pis, access to all ports and plugs, and fans to keep the hot-running components cool. I opted for a model by iUniker because I did a quick search on Amazon and this seem to fill those needs.
Synology NAS
This actually deserves an entire document to itself. I’ll elaborate more in a following post but it essentially came down to what I wanted to do with my cluster. I knew that I wanted an option to run a media server out of it, and while 64GB is a lot of space on a flash card, running localized storage on your nodes is not usually a good idea. The K8s documentation presents a much more comprehensive take, but the general idea is that using local storage ties your application workload to a single node and also degrades performance on that node. In addition, I wanted to gain experience with NAS (Network Attached Storage), so I decided to splurge and grabbed a Synology DS220j and a Seahawk 1TB HD.
Creating the Canvas
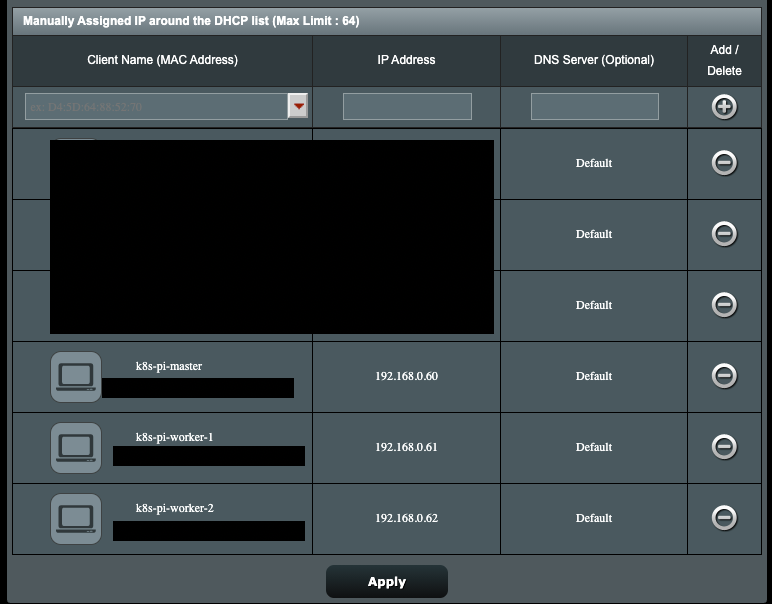
There’s a lot of good guides for setting up Raspberry Pis with Ubuntu. I used the official Raspberry Pi Imager to flash the OS onto an SD card. I needed ssh access to the cluster, so I made sure to add a file called ssh in the system-boot directory while I still had access to the SD card. Once the power supplies and networking cables were connected, I assigned a static IP address to each node using my router. Because I have an ASUS router, I was able to do it through the GUI. Your milage may vary.
After validating that I had ssh access and changing passwords/ssh keys, I had all of the hardware and OS installations complete. I had a blank canvas that I was now ready to splatter paint.
Putting it All Together
Once all of the hardware was set up, the cables were plugged in, and the networking hiccups are sorted out, I was ready to bootstrap a k8s cluster. On a high level, the roadmap for this process is:
- Create the base bare-metal machines with a suitable OS
- Obtain ssh access and privileges
- Install dependent packages
- Bootstrap k8s master node
- Bootstrap 1+ k8s worker nodes
- Configure to taste
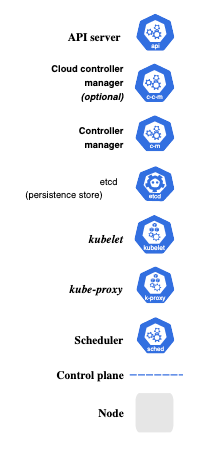
Many of these steps are generic and should be familiar to anyone working in software. The tricky pieces are steps (4) and (5), as bootstrapping k8s is a monumentally difficult task. Kubernetes involves a shitload of components that all work together to create the control plane, so installation is complicated.
Provisioning Kubernetes
There are many, many tools that make bootstrapping k8s clusters easier. There is also an absolutely phenomenal guide for getting K8s working the hard way (without automation). It is a 14 part lab series that bootstraps each of the individual components in order to set up a production grade cluster. Here’s an example systemd service that would be provisioned by that guide in order to run the kube apiserver.
[Unit]
Description=Kubernetes API Server
Documentation=https://github.com/kubernetes/kubernetes

[Service]
ExecStart=/usr/local/bin/kube-apiserver \\
  --advertise-address=${INTERNAL_IP} \\
  --allow-privileged=true \\
  --apiserver-count=3 \\
  --audit-log-maxage=30 \\
  --audit-log-maxbackup=3 \\
  --audit-log-maxsize=100 \\
  --audit-log-path=/var/log/audit.log \\
  --authorization-mode=Node,RBAC \\
  --bind-address=0.0.0.0 \\
  --client-ca-file=/var/lib/kubernetes/ca.pem \\
  --enable-admission-plugins=NamespaceLifecycle,NodeRestriction,LimitRanger,ServiceAccount,DefaultStorageClass,ResourceQuota \\
  --etcd-cafile=/var/lib/kubernetes/ca.pem \\
  --etcd-certfile=/var/lib/kubernetes/kubernetes.pem \\
  --etcd-keyfile=/var/lib/kubernetes/kubernetes-key.pem \\
  --etcd-servers=https://10.240.0.10:2379,https://10.240.0.11:2379,https://10.240.0.12:2379 \\
  --event-ttl=1h \\
  --encryption-provider-config=/var/lib/kubernetes/encryption-config.yaml \\
  --kubelet-certificate-authority=/var/lib/kubernetes/ca.pem \\
  --kubelet-client-certificate=/var/lib/kubernetes/kubernetes.pem \\
  --kubelet-client-key=/var/lib/kubernetes/kubernetes-key.pem \\
  --runtime-config='api/all=true' \\
  --service-account-key-file=/var/lib/kubernetes/service-account.pem \\
  --service-account-signing-key-file=/var/lib/kubernetes/service-account-key.pem \\
  --service-account-issuer=https://${KUBERNETES_PUBLIC_ADDRESS}:6443 \\
  --service-cluster-ip-range=10.32.0.0/24 \\
  --service-node-port-range=30000-32767 \\
  --tls-cert-file=/var/lib/kubernetes/kubernetes.pem \\
  --tls-private-key-file=/var/lib/kubernetes/kubernetes-key.pem \\
  --v=2
Restart=on-failure
RestartSec=5

[Install]
WantedBy=multi-user.target
My goodness! That’s 30 command line arguments to kube-apiserver binary. It’s pretty impressive that all of this stuff works as well as it does.

K3s
After debating on creating it the hard way for all of about 30 seconds, I started out looking for ways to have some other process do the work for me. The hobbyist wierdos (like me!) that actually find value in creating K8s clusters on Raspberry Pis in their spare time seem divided between MicroK8s and k3s. After doing some initial research and valuing resource-constraint over robustness, I chose an awesome piece of software called k3s as my K8s installer. K3s is “a highly available, certified Kubernetes distribution designed for production workloads in unattended, resource-constrained, remote locations or inside IoT appliances.” Sounds perfect for Raspberry Pis! I’m very pleased with my choice. Installation was quick, easy, and informative. It was not difficult to diagnose problems (helpful k3s output help me find the cgroup issue above and demonstrated the need for the open firewall ports 443 and 6443), and there was enough sensible defaults with configurability for my needs. Well done Rancher Labs! You’ve made an excellent product.

Getting it all Working
The first time I went through all of the setup, I did it manually. That led to a lot of lessons. I realized that I was going to have to do a lot of these annoying steps on each node. The SRE in me knew that I was toiling. My blood pressure began rising. My vision started blurring and I knew that I was going to have to find a configuration management tool to automate this process, otherwise my membership in the guild would be revoked.
Automating the Provisioning
Long ago when I was an intern, I got some experience with Ansible. It is simple, requires only ssh access to the newly provisioned Ubuntu Pis, and Python installed on both my control node (laptop) and the managed nodes (Pis). Because Ubuntu ships with Python and ssh access is something I’m guaranteeing, Ansible was a great choice for automated provisioning of this stuff. You can read more about the setup in the documentation here. Once you have each Pi set up with static IP address and the correct Ansible host configuration, you can run the playbook below using the ansible-playbook CLI.
Ansible Playbook Details
Many of the tasks in this playbook should be self-explanatory (apt-get update/upgrade, for example). Read on for a bit more on the not-so-obvious steps.
NFS-Common
In order to work with the Synology NAS, Ubuntu needs a set of tools provided in a package called NFS-Common. After much constrenation and troubleshooting as to why the heck K8s wouldn’t recognize the NAS as a valid NFS StorageClass, I finally figured out that I was missing a package that the NFS provisioner relied upon. Adding it as an install step in Ansible ensured that I wouldn’t make that costly and troublesome mistake in the future.
Setting CGroup Values
Long story short, cmdline.txt is a file that is run at boot time and configures the Linux Kernel. One of the features of the Linux Kernel that enables Docker to run are cgroups. Diving deeper would probably extend my knowledge into speculation, but the essential point of this step is that in order for Docker to function, particular cgroup values need to be set.
K3s
The ansible tasks that are done for k3s are actually quite simple. They download and run the provided k3s install script. Based on whether the script is being run on the master or the worker nodes, the playbook then takes follow up action to create a working cluster.
Tagging Worker Nodes
The last step of the playbook tags each of the worker nodes with a “worker” label. This is more of a feature than a necessity. This post-install step emerged out of a Blameless Postmortem™ session conducted with myself. I had a particularly troublesome pod without resource constraints that decided to schedule itself on the master node. As it rapidly ran out of control, resource limitations on the master node became apparent when the api server was no longer reachable and my cluster was kaput.

By creating labels for my worker nodes, I was able to set the NodeSelector field on my unregulated deployments to only schedule themselves on worker nodes. This action ensures that the master node will not schedule pods onto itself that have the capability to cause real problems. Of course, the long term solution to this is to write better, non-troublesome code or set sensible resource limitations. Everything in my SRE training tells me that:
- Writing bug-free code is impossible
- Resource constraints will be relaxed when performance impact business metrics
With those two laws of nature in mind, developing with the mindset that everything will fail spectacularly at the worst time is the only logical way forward.
Accessing the Cluster
Once I ran the ansible playbook and had a running cluster, I just had to access the control plane via kubectl and I was ready to go. All that entailed was SSH’ing into the master node, copying the contents of /etc/rancher/k3s/k3s.yaml, and setting it as an option in kubeconfig.
apiVersion: v1
clusters:
- cluster:
    certificate-authority-data: <removed>
    server: https://kmaster:6443  # master node. "kmaster" set to static IP in /etc/hosts
  name: rpi-local
contexts:
- context:
    cluster: rpi-local
    user: rpi-local
  name: rpi-local
current-context: rpi-local
kind: Config
preferences: {}
users:
- name: rpi-local
  user:
    client-certificate-data: <removed>
    client-key-data: <removed>
After kubectl access was established, I had a running kubernetes cluster in my apartment!
$ kubectl get nodes
NAME       STATUS   ROLES                  AGE   VERSION
kworker1   Ready    worker                 2d    v1.20.4+k3s1
kmaster    Ready    control-plane,master   3d    v1.20.4+k3s1
kworker2   Ready    worker                 2d    v1.20.6+k3s1
Now I just needed something to run on it…
Conclusion
The essential workflow of all of this loosely mimics how you could choose to run a datacenter in your own company. I started out with an ill-defined goal, spent an arbitrary amount of money on hardware that wasn’t super well-researched, encountered some silly failures, and had a great time in the process. Before the advent of and the large adoption of compute as a service via cloud providers, this was likely life for many a sysadmin. This post almost certainly reveals my youth in the software industry, because setting up physical infrastructure is something of a novelty for me. More and more companies are going to ‘x’aaS, where everything except application code is provided for a modest fee. The idea of buying hardware is going out of style. However, when things do inevitably go wrong, or if you don’t have the capital to shell out a bunch of money for a managed service, provisioning your own is still really rewarding! The lessons that I learned from setting up my own K8s cluster on a stack of Raspberry Pis were likely not far off from what many start-ups already know.
Cloud Providers are Better at Infrastructure than I am
If I didn’t learn anything else, this would be the single most valuable piece of advice. There is a multi-billion dollar industry devoted to this exact kind of project. If you/your business can afford it, and K8s is absolutely the technology you require, you should 100% buy it from a cloud provider. Production workloads would never work on this and I wouldn’t wish managing this cluster with anything on the line upon my worst enemy. I’d be embarrassed to sign any realistic SLA with a customer.

Of course, when messing around at home, this lesson does not apply. I didn’t do this as a PoC for my PO or PM, I did it because I could. Which brings me to my next lesson.
Learning things is Fun
Even though I spent a bunch of time frustrated with some of the nuances of running this infrastructure, you better bet that I’ve used some of the skills I developed on this project at work to make my life easier. Just learning about the /etc/hosts file was valuable. Figuring out how to set a static IP hasn’t helped me professionally, but understanding what actually happens when I write kmaster into the address bar is useful. Creating everything manually and then automating it is a task that I do almost every day professionally. Having a power outage and being able to recover from it was valuable.
Writing Code isn’t the only thing in Software Development. Not Even Close.
This lesson isn’t something that this single project has taught me. The industry trend is DevOps or Die. There’s something about actually physically provisioning the infrastructure that runs a complicated piece of software like Kubernetes that really gives one an appreciation for the sheer amount of complexity that Agile/Lean/DevOps methodologies really try to abstract away from developers, particularly so they can focus on writing application code. If all this stuff worked seamlessly, developers at Fortune 100 companies could happily write yet another Spring Boot application, commit it at 5pm on a Friday, and know that their code will be happily humming away in a far-away server somewhere, translating customer data in business value.

With the tooling and extreme access to on-demand cloud provider resources, operations team are fading into the sunset in favor of full-service cloud offerings and empowered developers. My personal experience has been that the DevOps is not here yet. There is still a lot of room for the industry to fully emphasize the “ops” portion of a development project. Continuing to sharpen the sword in the tooling, deployment, and operational space allows me to continue to build skills that will only become more valuable in the future.
Addenda
A Note on Performance
While K8s itself has a shockingly low footprint when installed with k3s, Raspberry Pi 4s are still not an exceedingly high performing device when compared with other recommended machines for K8s. For example, Azure recommends that you run K8s at minimum on their Standard_D2s_v3, which run 2 Intel Broadwell 2.4Ghz processors and 8GBs RAM. By contrast, the Raspberry Pi 4 runs a 1.5Ghz ARMv8 CPU with up to 8GBs RAM. So there’s a lot of space in between. So I wouldn’t expect comparable performance to a cloud-based solution, but it costs a heckuva lot less.

On Linux and the Raspberry Pi
I love the Raspberry Pi. It has been a huge boon for me, as having a very low cost linux server that I can set up in minutes in my home has really allowed me to mess around with the sysadmin tools and experiments that have been massively beneficial in my professional life. I’ve encountered the inner workings of production-grade infrastructure and it helps to have a sandbox to practice in. Linux has some wonderful built-in command-line tools that require some amount of muscle memory but allow for a lot of troubleshooting and efficiency. As a result, building some of the skills that I use on a day-to-day basis professionally have been a direct result of trying and failing my way around a piece of hardware that I have full control over. A lot of debugging experience comes solving problems that I create for myself. Raspberry Pi has allowed me opportunity to mess around without consequences and learn a great deal in the process.

A Raspberry Pi is a physical piece of hardware with nearly infinite customizability. I’ve used them to build a physical news ticker, an IOT ski trip planner, a RetroPie, a Pi-hole, and various other gizmos around the house. Other (more impressive) developers have created Magic Mirrors, fully automated dashcams for their cars, automated pentesting devices, and even supercomputers. The sky is truly the limit. If you’re looking to get started, I’d recommend heading over to Adafruit, picking up whatever hardware tickles your fancy, and going through one of their many useful tutorials.